REVIEW · OAHU
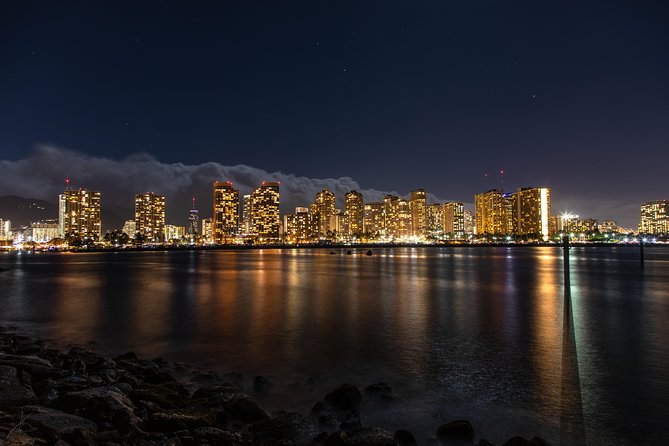
Honolulu Sunset & Light Painting Experience
Book on Viator →Operated by Oahu Photo Tours · Bookable on Viator
A great night starts with a sunset. This Oahu experience mixes sunset shooting at China Walls with guided light-painting and long-exposure night photography in some of the island’s best dark-sky angles. I like that the small group size keeps the pace calm, and I also like that you get practical coaching you can use right away, even with an iPhone. One possible drawback: the whole plan depends on the weather, and the tour does not include food or drinks.
You’ll spend the evening bouncing between three stops built for the transition from sunset to stars. The first hour focuses on sunset composition, then you get set up for night-sky shooting at Makapu‘u Point, and you finish at Makapu‘U Beach for more creative techniques like light painting and steel wool-style effects. The tone is hands-on and photo-first, so if you want a purely scenic, sit-and-watch tour, this may feel more active than you expect.
In This Review
- Key Things I’d Bet You’ll Care About
- Why Honolulu’s Sunset + Light Painting Tour Works Better Than a Typical Photo Walk
- Stop 1 at China Walls: Sunset Photos With a Real Composition Goal
- Stop 2 at Makapu‘U Point: Getting Your Night-Sky Gear Dialed In
- Stop 3 at Makapu‘U Beach: Stars, Lighthouse Views, Light Painting, and Steel Wool Effects
- What You’ll Learn About Night Photography (Beyond Just Where to Stand)
- Gear, Tripods, and the Included Light Painting Tools: What That Means for You
- The Group Size, Pickup, and Timing: How the Night Stays Manageable
- Weather Reality Check: When the Plan Changes
- Guide Style: Fun, Patient Instruction, and One Safety Note to Consider
- Who This Tour Fits Best (And Who Might Want Something Else)
- Price and Value: What You’re Really Paying For
- Practical Tips Before You Go (So Your Photos Actually Improve)
- Should You Book Honolulu Sunset & Light Painting?
Key Things I’d Bet You’ll Care About
- Small group of up to seven means more time with your guide and quicker help when your settings are off
- Tripods and light-painting tools are included, so you can focus on learning instead of renting gear
- Three purposely chosen stops take you from sunset to stars with less guesswork on timing
- iPhone-friendly long exposure coaching shows you how to get night results without needing a big camera setup
- Creative night techniques include light painting and steel wool-style photos, not just standard star photos
Why Honolulu’s Sunset + Light Painting Tour Works Better Than a Typical Photo Walk
On Oahu, it’s easy to walk into a sunset and hope you got lucky with the timing. This tour tries to beat that problem. You build a photo plan step-by-step, starting with the sunset at China Walls, then moving to a lookout for night-sky setup, and finally landing at the beach for the more experimental stuff.
The big value here is the coaching style. Guides like Mac, Andrew, Curt, and Malcolm come through in the feedback as funny, patient, and willing to explain things in plain terms. More importantly, they don’t just point you at a view. They help you make the view look how you want, whether you’re using a camera or an iPhone.
There’s also a practical rhythm. You get enough time at each stop to set up a tripod, adjust your framing, and try a few variations. That matters because night photos often fail for boring reasons: shaky hands, wrong exposure length, or focusing on the wrong thing. The guide’s job is to fix those issues fast so you leave with usable images, not just scenic memories.
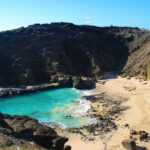
You can also read our reviews of more evening experiences in Oahu


Stop 1 at China Walls: Sunset Photos With a Real Composition Goal
Your evening begins at China Walls, where the goal is simple: use the sunset light while you’re still able to see clearly enough to compose and focus.
This stop gets about 1 hour, which is a gift. Most “sunset tours” rush you through the scene like it’s a theme park line. Here, you have time to:
- position yourself and test a tripod placement
- learn how to balance the bright horizon with darker foreground elements
- capture the moment as the colors shift rather than as one single shutter press
China Walls is also a smart choice because it’s built for photography. You can aim for shots that include the coastline feel and the sunset glow without needing a complicated setup. It’s a good place to warm up your eyes and your settings before the night gets dark.
One consideration: once the sun drops, your success rate depends on how quickly you can get your gear ready. If you’re new to tripods or long exposure work, watch how your guide sets up and copies the rhythm. Don’t wait until you’re already missing the colors to start adjusting.
Stop 2 at Makapu‘U Point: Getting Your Night-Sky Gear Dialed In
After China Walls, you head to Makapu‘U Point. This stop lasts about 30 minutes, so think of it as the setup phase.
The point here is not endless stargazing. It’s learning how to start capturing the night sky in a way that actually looks intentional. Your guide will help you understand the basics that often decide whether your photo looks sharp and bright or soft and muddy:
- tripod stability and how to keep the camera still
- exposure choices for darker skies
- what to do so your focus doesn’t drift in the dark
The shorter time window can feel fast, but that’s the logic. You don’t want to waste prime darkness on trial-and-error basics. Instead, you learn the setup at Makapu‘U Point, then you carry those skills to the beach where you’ll apply them creatively.
If you’re traveling with kids or teens, this stop tends to be a good “learning with action” moment. One review called out that the guide was attentive to younger travelers, which matches the idea of a quick, guided gear lesson rather than an endurance hike.
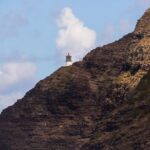
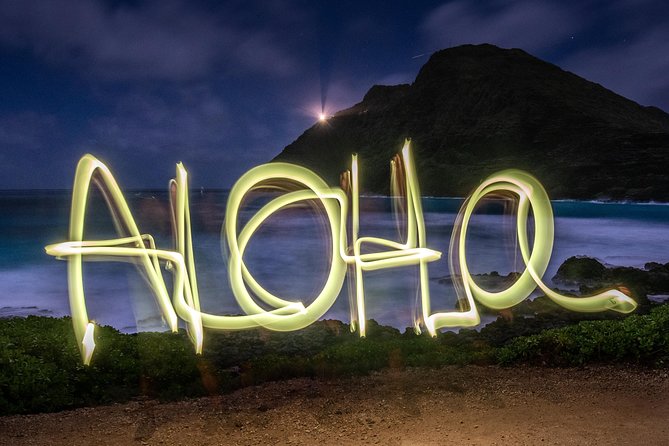
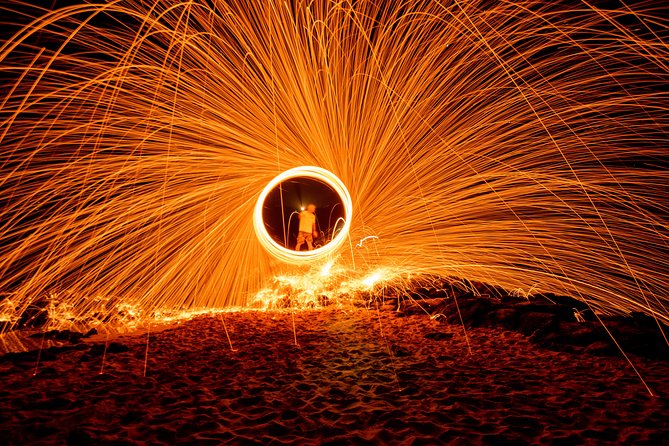
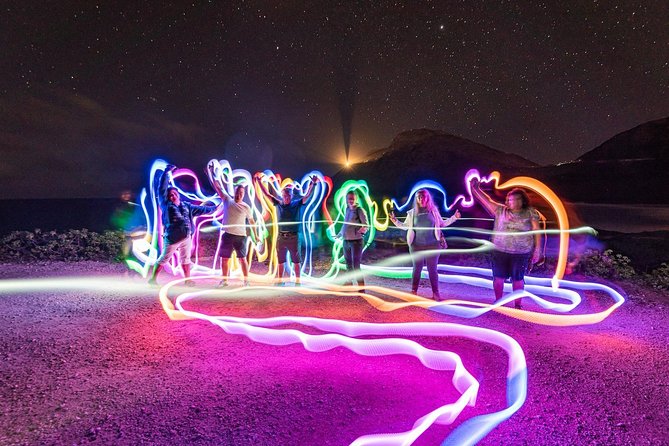
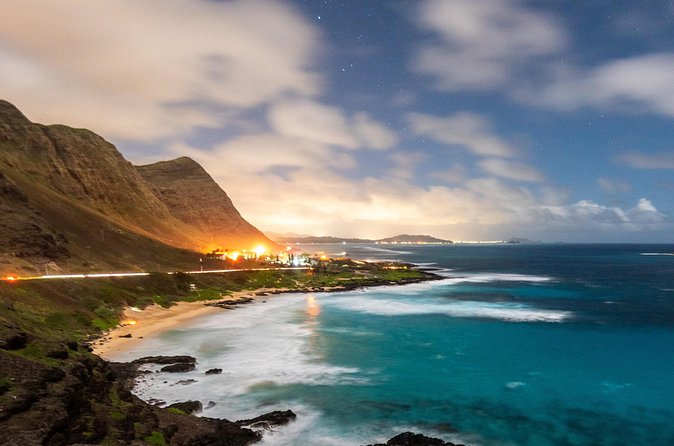
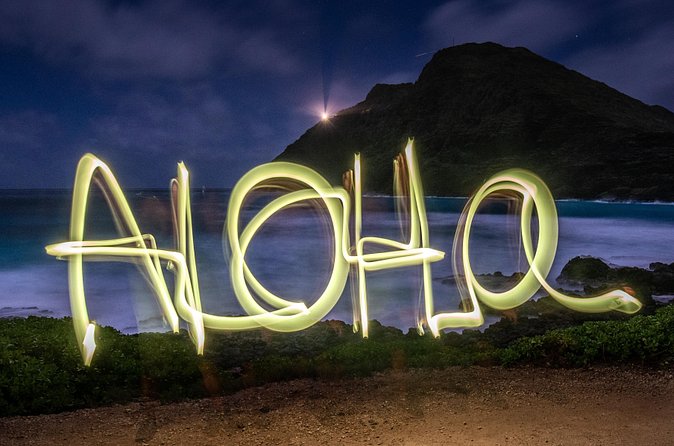
Stop 3 at Makapu‘U Beach: Stars, Lighthouse Views, Light Painting, and Steel Wool Effects
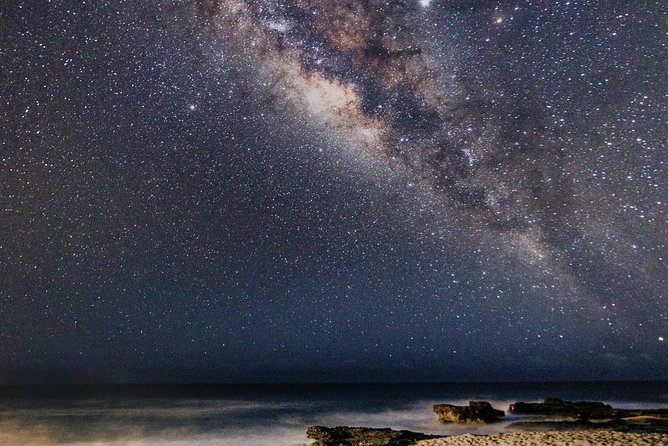
The final stop is Makapu‘U Beach, and it’s the most “wow” part of the tour. You’ll spend about 1 hour here, with the night sky and lighthouse-style visuals as the backdrop.
This is where the tour stops being just about getting a pretty star photo and becomes about experimenting. The included activities are:
- shooting the stars and the lighthouse area at the beach
- light painting using the provided tools
- steel wool-style photo attempts (a creative, high-impact effect)
This part is also why the tripod is included. Long exposure photography is picky. If your tripod wobbles, your light effects blur. If your timing is off, your light strokes don’t show the shape you intended. The guide’s feedback during this segment is the difference between random light trails and pictures that look like art.
Practical note: the tour does not provide food or bottled water. That’s totally normal for this type of activity, but it means you should plan ahead. If you get chilled easily, bring something warm even if you were comfortable earlier. You’ll likely be working longer than you think once the tripod is set.
What You’ll Learn About Night Photography (Beyond Just Where to Stand)
The tour’s promise isn’t only that you’ll see great views. It’s that you’ll leave with night photography skills you can use on your own.
From the types of coaching described in the experiences, you can expect help with:
- long exposure techniques that work on night skies
- practical composition choices, like what to include in the frame and how to keep it balanced
- iPhone settings and tricks, including how to handle exposure time and keep the phone stable for night results
One standout theme in the feedback: guides help people keep shooting even if they start nervous. A first timer with a phone can still walk away with images that look like they came from someone who planned ahead.
Another theme: guides don’t treat your gear like a barrier. Several reviews specifically mention iPhone tips and iPhone-compatible tripods. So if you’re worried you’ll be outclassed by DSLR owners, you probably won’t be. The instruction is geared toward what you actually have in your hands.
If you want photos that improve your whole trip, this tour is a smart place to start. Your sunset and night shooting practice gives you a repeatable workflow, set up stable, test exposure, adjust, try again, so the rest of your Oahu days get easier.


Gear, Tripods, and the Included Light Painting Tools: What That Means for You
You don’t need to guess what to bring for this experience. The tour includes tripods and light-painting tools. That’s a big deal for value, because it removes one of the most frustrating travel problems: arriving with the right location but wrong gear.
It also makes the class part work. When everyone has similar tripod support, the guide can teach technique without you spending half the evening trying to rig something up yourself.
That said, your best results still depend on your habits:
- be ready to set up quickly once you arrive
- follow the guide’s order of operations for focusing and exposure
- don’t change five things at once, or you won’t learn what actually helped
If you’re bringing your own camera, great. If you’re coming with a phone, also great. The tour is designed to teach you how to use the camera you brought, not to make you rent an expensive setup.
The Group Size, Pickup, and Timing: How the Night Stays Manageable

This is a maximum of seven travelers experience. That number matters more than it sounds. When you’re learning night photography, you want help when you need it, not when the guide has time between groups.
In practical terms, small group size usually means:
- less waiting while your tripod space is sorted out
- quicker corrections when your focus or exposure is off
- more chance for the guide to watch what you’re doing and adjust in real time
Pickup is available only at selected Waikiki hotels. The tour starts at the Honolulu Zoo (151 Kapahulu Ave, Honolulu, HI 96815) and ends back at the meeting point. If you’re not sure whether your hotel qualifies, you should confirm by contacting the operator directly, since pickup is limited.
Also, keep in mind: the tour is offered in English, and you’ll receive confirmation at booking. The activity is also near public transportation, so you have options if you’re not using a hotel pickup.
Timing note: it’s about 4 hours total (approx.). That’s long enough to get meaningful practice, but short enough that you won’t feel stuck in one place all night.
Weather Reality Check: When the Plan Changes
This experience requires good weather. That’s not just a fine print detail, it’s the core risk to understand.
Night photography can be ruined by:
- clouds that wipe out star visibility
- rain or fog that kills long exposure clarity
- wind that makes tripod work harder
The good news is the tour handles this scenario with a redo option: if it’s canceled due to weather, you’ll be offered a different date or a full refund.
One more thing: there’s also a minimum number of travelers requirement. If the minimum isn’t met, you’ll be offered a different date or a full refund. That’s the kind of business constraint you can’t avoid, but it helps explain why dates sometimes shift.
Guide Style: Fun, Patient Instruction, and One Safety Note to Consider
Most of the guidance energy comes through in the reviews in a very consistent way. Guides like Mac and Andrew are described as engaging, helpful, and funny, with a strong focus on teaching night photography. Multiple reviews mention extra time to explain iPhone night tips and the chance to be creative with light painting.
That said, one critical review raised concerns about the guide’s behavior and driving style, including feeling unsafe and finding comments not appropriate for a family group. I’m mentioning this because it matters. If you’re traveling with younger kids, or you prefer a more formal, quiet tour vibe, it’s worth asking the operator about guide conduct expectations and emphasizing what your family is comfortable with.
As with any small-group, off-the-beaten-path night tour, your comfort level is part of the decision. Look at the overall fit: fun and flexible is the theme for many guests, but it isn’t going to feel sterile or corporate.
Who This Tour Fits Best (And Who Might Want Something Else)
This tour is a great fit if you:
- want to learn night photography, not just take pictures at one stop
- like hands-on activities like light painting and steel wool-style photo effects
- want a small-group experience with more personal instruction
- are shooting with an iPhone and want practical long exposure help
It’s also a strong choice for couples and small friend groups because you’ll get quality shooting time without a huge crowd.
You might consider a different kind of tour if you:
- want a restful, low-effort night out with no tripod work
- feel strongly uncomfortable with casual humor or any travel-day driving stress
- don’t want to be outside after dark for multiple hours
Price and Value: What You’re Really Paying For
Even without seeing a price tag here, I’d judge value by what’s included and how the evening is structured.
You’re paying for three things that matter:
- instruction in night photo technique, including iPhone guidance
- included gear (tripods and light-painting tools)
- access to specific photo stops timed for sunset fading into stars
On top of that, admission for the key locations in the schedule is listed as free for the stops provided. So you’re not stacking extra entry fees on your night budget.
The main “not included” items are basic, no bottled water, and no food or drinks. That’s the kind of tradeoff you can manage with a quick snack and refill plan before you go.
Practical Tips Before You Go (So Your Photos Actually Improve)
- Bring something warm enough for after dark, since you’ll be working at tripods outside.
- Have your phone charged. Night modes and long exposures drain battery fast.
- Wear shoes you can stand in while composing. You’ll be parked for moments, not constantly walking.
- Plan for focus and patience. Night photos can take several tries, and that’s normal.
- If you’re sensitive to language or want a calm vibe, communicate expectations early.
If you do those things, you’ll get more out of the coaching time instead of fighting basic comfort issues.
Should You Book Honolulu Sunset & Light Painting?
Yes, you should book it if your goal is night photos with real learning, not just sightseeing. This tour is designed like a mini workshop: sunset practice at China Walls, night-sky setup at Makapu‘U Point, then creative results at Makapu‘U Beach with light painting and steel wool-style effects.
I’d skip it only if you want low effort, or if you strongly prefer a strict, formal tone and you’re traveling with kids who need very predictable behavior. Also remember the simple truth: it’s weather-dependent, and you’ll need to manage yourself with no food or water provided.
If you’re the kind of person who likes turning a beautiful view into a finished photo, this is the kind of Oahu night that can genuinely change how you shoot the rest of your trip.